
Why I built this
Hi readers. In this article, I would like to show the process I took for building & publishing this website (https://yella.dev). But before that, let's see some background.
My goal was to build a personal website with blog posts written in Markdown & Text-to-speech features like "Listen". The content should be committed & pushed to GitHub, which should be automatically deployed.
I designed & deployed this website to create a clean space to host my portfolio and writings. I've tried popular platforms like Wordpress, Medium & Substack but didn't like their customization options to reflect my personal taste. Therefore, I decided to create a new portfolio that lists my projects, books & writings in one single place, and this website is the answer.
I bought my domain (yella.dev) on Namecheap Domain Seller. The word Yella is a prefix of my last name: Yellavula.
Options for static site generation
I shortlisted a few static site generators and finally picked Zola, discarding the rest for the reasons below:
| Generator | Language | Verdict | Why |
|---|---|---|---|
| Pelican | Python | ❌ | I'd used it before and wanted to try something more modern this time. |
| Astro Docs | JavaScript | ❌ | Not a fan of JS tooling — too many NPM dependencies & security vulnerabilities. I also wanted to keep static site generation and builds as separate technologies. |
| Hugo | Go | ❌ | A great tool, but complex with a steep learning curve. My goal was to get started as fast as possible. |
| Zola | Rust | ✅ | The most modern of the lot, combining performance and simplicity — the fastest way to write in Markdown & build a static site, with a clean set of themes. |
I picked Zola for its mix of speed and simplicity, and liked a theme called "Oceanic Zen" for my blog & website.
Initial Setup with Zola
I created my project by first installing zola on Mac OSX:
brew install zola
Once installed, I initialized a Zola project using "init" command:
zola init yella.dev
This creates a directory called yella.dev and places necessary files like contents directory and config.toml. You can see Zola directory structure here: Zola Directories
Zola uses "Sass" extension language for Cascading Style Sheets (CSS) making it easier to build styles and reuse them. The file: config.toml controls how Zola builds the website. For full list of available options, refer here: Zola Configuration
Picking Oceanic Zen theme for look & feel
Zola has a wide-variety of themes covering different usecases (blog, docs etc.) here: Zola themes
I picked Oceanic Zen due to its minimalism and clean layout. I vendored the theme from GitHub and copied into "themes/" directory in the project. I adjusted the font, font-size and colors based on my taste.
Next step: Deploying the website
Once the content is ready in content folder and other tweaks with the theme & custom font, now is the time to deploy the website.
I used various Amazon Web Services (AWS) to deploy my website End-to-End (E2E). The services I leveraged in the process are:
- AWS Amplify - For hosting the Zola build contents (public/ directory)
- AWS Simple Storage Service (S3) - For storing website images & binaries (MP3)
- Amazon CloudFront - For delivering S3 contents securely
- Amazon Route 53 - For connecting custom domain (yella.dev) to Amplify app
- Amazon IAM - For creating service accounts to access S3 & CloudFront distribution. This is needed for GitHub integration.
Deployment Architecture
The architecture has four main phases:
- Publishing phase (For writing blog articles)
- Text to speech conversion phase (for converting articles into listenable audio)
- Delivery phase (to deploy the update)
- Cache invalidation phase (to reset audio & static files)
These four phases are divided into five partitions as shown in the below flow diagram.
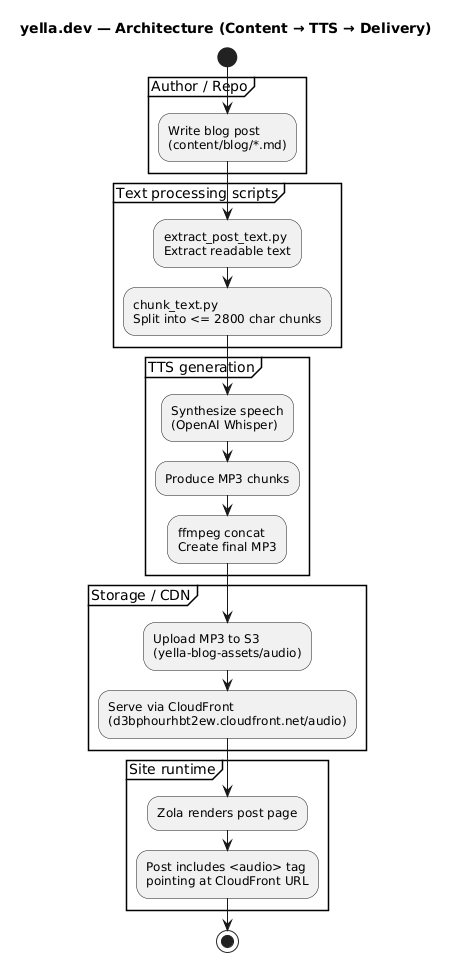
The architecture is straight-forward with separation of responsibility handled by different entities. For example, Publishing happens locally and then pushed to GitHub repository. A GitHub CI workflow extracts text from new article, and converts it into audio using OpenAI Whisper API, then upload to S3. Finally, there is a cache invalidation step that resets the blog static assets like images and audio to serve fresh content. This is invalidating all at the moment, but can be optimized further.
As AWS Amplify is already listening to the repository changes, it automatically syncs changes to repo into Amplify app. This is how the blog content gets deployed. The custom domain (yella.dev) is connected with Amplify via Route53 A & CNAME records for yella.dev, www.yella.dev respectively.
Security Considerations
There are multiple security aspects considered during the development.
- All secrets are stored in encrypted GitHub secrets. Can be improved by migrating them to AWS Secrets Manager
- To upload audio to S3 and for invalidating cache, an IAM OIDC trust relationship with required permissions is setup between GitHub repository & AWS CloudFront distribution with Least-privilege principle.
{ "Version": "2012-10-17", "Statement": [ { "Sid": "CloudFrontInvalidate", "Effect": "Allow", "Action": [ "cloudfront:ListInvalidations", "cloudfront:CreateInvalidation" ], "Resource": [ "arn:aws:cloudfront::REDATCED:distribution/REDATCED" ], "Condition": { "StringEquals": { "aws:PrincipalAccount": "REDATCED" } } }, { "Sid": "S3UploadAudio", "Effect": "Allow", "Action": [ "s3:PutObject", "s3:AbortMultipartUpload", "s3:ListBucket" ], "Resource": [ "arn:aws:s3:::yella-blog-assets", "arn:aws:s3:::yella-blog-assets/audio/*" ], "Condition": { "StringEquals": { "aws:PrincipalAccount": "REDATCED" } } } ] } - The source code is scanned with a SAST tool like Semgrep to make sure code is free from supply-chain vulnerabilities.
- Add Web Application Firewall (WAF) for both Amplify App (blog content) & CloudFront distribution (blog static assets) to protect from bots & common attacks
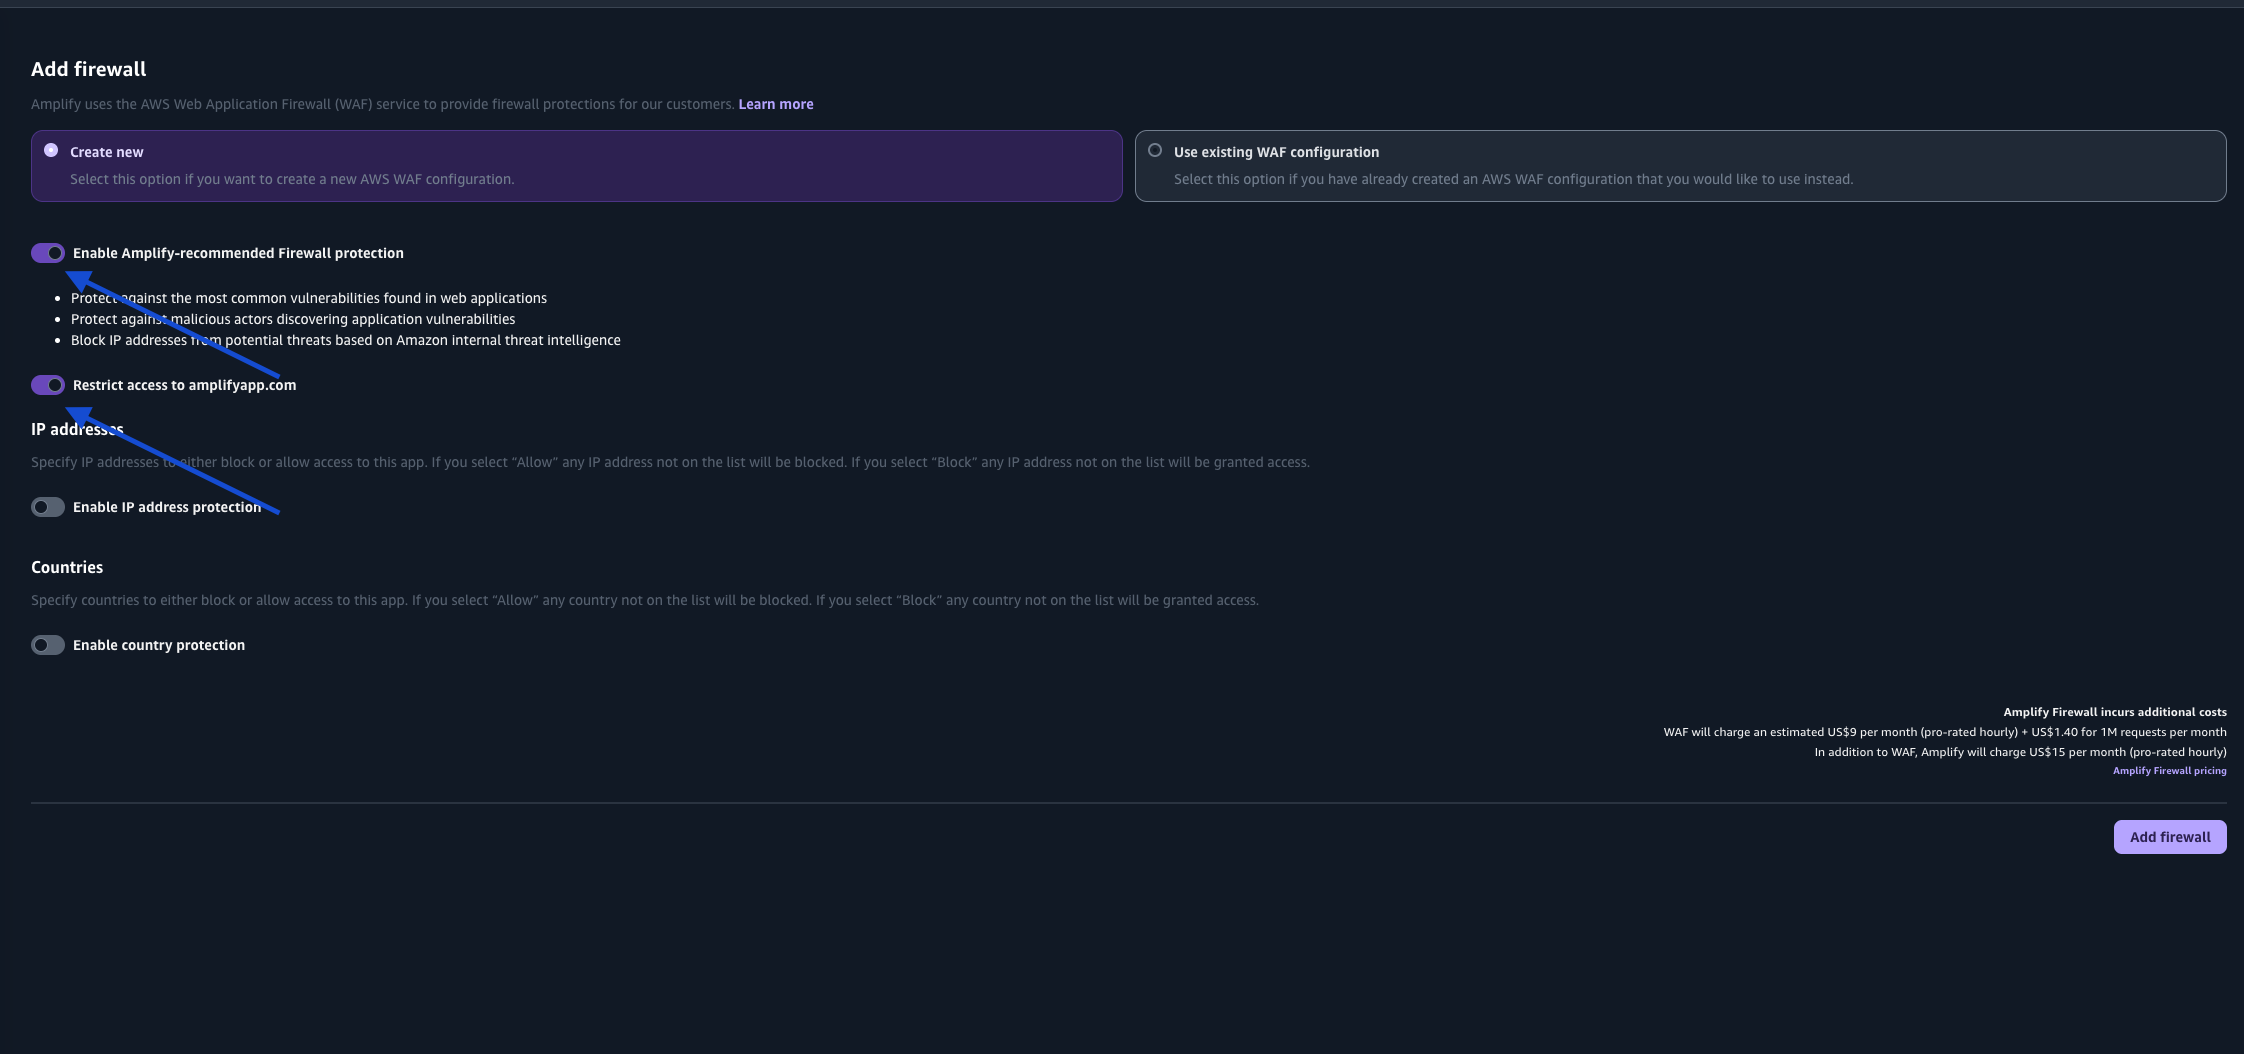 Make sure to toggle these settings ON on Amplify Firewall:
- Enable Amplify-recommended Firewall protection
- Restrict access to amplifyapp.com
Conclusion
Building a website using a platform like Vercel or Netlify can be easy but it overlooks a lot of options like customization, and security. I want to shed some light on my entire process of how I built this website & how you can learn from it. You can see the website source code here: Source Code on GitHub
Thanks for reading this article.